명품자바프로그래밍 9장 요약, 예제
9장. GUI 기초, AWT와 Swing 9장. GUI 기초, AWT와 Swing 요약 GUI : Graphical User Interface. 이미지나 그래픽을 이용하여 화면을 구성하고 (키보드 등) 입력도구를 이용하여 편리하게 작성된 사용자 인터페이..
coding-restaurant.tistory.com
명품자바프로그래밍 9장 연습문제
명품자바 9장 연습문제 LuxuryJava Chapter 09. (실습문제는 다음 글에 있습니다.) | 연습문제 9-1 | 자바에서는 AWT 컴포넌트와 스윙 컴포넌트를 제공한다. 이들 중 어떤 것이 경량 컴포넌트이고, 어떤 것이 중..
coding-restaurant.tistory.com
명품 자바프로그래밍 9장 실습문제
1~8번 문제와 답
LUXURY JAVA Chapter 09.
1. "Let's study Java"라는 문자열을 타이틀로 가지고 프레임의 크기가 400*200인 스윙 프로그램을 작성하라.

package test09;

import javax.swing.JFrame;

public class h0901 extends JFrame {
	h0901() {
		setTitle("Let's study Java");
		setSize(400, 200);
		setDefaultCloseOperation(EXIT_ON_CLOSE);

		setVisible(true);
	}

	public static void main(String[] args) {
		new h0901();
	}
}
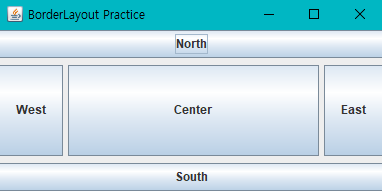
2. BoderLayout을 사용하여 컴포넌트 사이의 수평 수직 간격이 각각 5픽셀, 7픽셀이 되도록 스윙 응용프로그램을 작성하라.

package test09;

import java.awt.BorderLayout;
import java.awt.Container;

import javax.swing.JButton;
import javax.swing.JFrame;

public class h0902 extends JFrame {
	h0902() {
		setTitle("BorderLayout Practice");
		setSize(400, 200);
		setDefaultCloseOperation(EXIT_ON_CLOSE);

		Container c=getContentPane();
		c.setLayout(new BorderLayout(5,7));

		c.add(new JButton("North"), BorderLayout.NORTH);  //대문자
		c.add(new JButton("West"), BorderLayout.WEST);
		c.add(new JButton("Center"), BorderLayout.CENTER);
		c.add(new JButton("East"), BorderLayout.EAST);
		c.add(new JButton("South"), BorderLayout.SOUTH);
		setVisible(true);
	}

	public static void main(String[] args) {
		new h0902();
	}
}
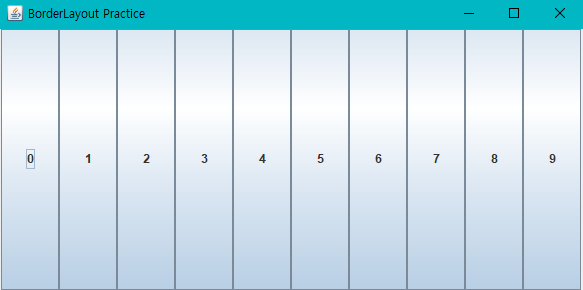
3. GridLayout을 사용하여 다음 그림과 같이 한 줄에 10개의 버튼을 동일한 크기로 배치하는 스윙 프로그램을 작성하라.

package test09;

import java.awt.Container;
import java.awt.GridLayout;

import javax.swing.JButton;
import javax.swing.JFrame;

public class h0903 extends JFrame {
	h0903() {
		setTitle("BorderLayout Practice");
		setSize(600, 300);
		setDefaultCloseOperation(EXIT_ON_CLOSE);

		Container c=getContentPane();
		c.setLayout(new GridLayout(1,10));

		for(int i=0; i<10; i++) {
				c.add(new JButton(i + ""));
		}
		setVisible(true);
	}

	public static void main(String[] args) {
		new h0903();
	}
}
4. 문제 3을 수정하여 다음 결과와 같이 각 버튼의 배경색을 서로 다르게 설정하라.

※ 패널-GridLayout을 사용하며 색이름은 배열과 for문을 이용해보자.
package test09;

import java.awt.Color;
import java.awt.Container;
import java.awt.GridLayout;

import javax.swing.JButton;
import javax.swing.JFrame;

public class h0904 extends JFrame {
	h0904() {
		setTitle("Ten Color Buttons Frame");
		setSize(600, 300);
		setDefaultCloseOperation(EXIT_ON_CLOSE);

		Container c=getContentPane();
		c.setLayout(new GridLayout(1,10));

		for(int i=0; i<10; i++) {
			Color[] col= {Color.RED, Color.ORANGE, Color.YELLOW, Color.GREEN,
					Color.CYAN, Color.BLUE, Color.MAGENTA,
					Color.GRAY, Color.PINK, Color.LIGHT_GRAY};
			String text=Integer.toString(i);
			JButton b=new JButton(text);
			b.setOpaque(true);
			b.setBackground(col[i]);
			c.add(b);
			}
		setVisible(true);
	}
	public static void main(String[] args) {
		new h0904();
	}
}
5. GridLayout을 이용하여 다음 그림과 같이 16개의 색을 배경색으로 하는 4*4 바둑판을 구성하라. #9장실습문제5번
※ 16개의 JLabel 컴포넌트를 생성하고 각 레이블 컴포넌트의 배경색을 칠한다음 하나씩 GridLayout을 가진 컨테이너에 붙이면 된다.

package Luxuryjava09;

import java.awt.Color;
import java.awt.Container;
import java.awt.GridLayout;

import javax.swing.JFrame;
import javax.swing.JLabel;

public class h0905 extends JFrame {
	h0905() {
		setTitle("Ten Color Buttons Frame");
		setSize(600, 300);
		setDefaultCloseOperation(EXIT_ON_CLOSE);

		Container c=getContentPane();
		c.setLayout(new GridLayout(4,4));

		for(int i=0; i<16; i++) {

			Color[] col= {Color.RED, Color.ORANGE, Color.YELLOW, Color.GREEN,
					Color.CYAN, Color.BLUE, Color.MAGENTA,
					Color.GRAY, Color.PINK, Color.LIGHT_GRAY,
					Color.RED, Color.ORANGE, Color.YELLOW, Color.GREEN,
					Color.CYAN, Color.BLUE};
			JLabel label=new JLabel(i+"");
			label.setBackground(col[i]);
			label.setOpaque(true);
			c.add(label);
			}
		setVisible(true);
	}
	public static void main(String[] args) {
		new h0905();
	}
}
6. 20개의 10*10 크기의 JLabel 컴포넌트가 프레임 내에 (50,50) 위치에서 (250,250) 영역에서 랜덤한 위치에 출력되도록 스윙프로그램을 작성하라. 프레임의 크기는 300*300으로 하라.

※ JLabel 컴포넌트의 위치를 랜덤하게 설정하기 위해 (x,y) 좌표는 다음과 같이 구한다
int x = (int) (Math.random() * 200) + 50;
int y = (int) (Math.random() * 200) + 50;
label.setLocation(x,y);
label.setSize(20,20);
label.setOpaque(true);
package test09;
import java.awt.Color;
import java.awt.Container;
import javax.swing.JFrame;
import javax.swing.JLabel;
public class h0906 extends JFrame {
public h0906() {
setTitle("9장 6번문제");
setSize(300, 300);
setDefaultCloseOperation(JFrame.EXIT_ON_CLOSE);
Container c = getContentPane();
c.setLayout(null);
for (int i = 0; i < 20; i++) {
int x = (int) (Math.random() * 200) + 50;
int y = (int) (Math.random() * 200) + 50;
//int z = (int) (Math.random() * 100) + 1;
JLabel label = new JLabel((int)(Math.random() * 100)+"");
// label.setLocation(x,y);
// label.setSize(20,20);
label.setBounds(x, y, 20, 20);
label.setOpaque(true);
label.setBackground(Color.red);
c.add(label);
}
setVisible(true);
}
public static void main(String[] args) {
new h0906();
}
}
7. 다음과 같은 GUI 모양을 가진 스윙 프레임을 작성하라. #9장실습문제7번 #자바계산기만들기 #자바계산기틀
※ JButton, JLabel, JTextField 사용. 여러개의 컴포넌트와 패널을 가진 스윙 프레임으로 컨텐트팬의 NORTH, CENTER, SOUTH에 각각 JPanel을 상속받은 패널을 붙이고 그 곳에 버튼이나 JLabel을 붙이면 된다.


package Luxuryjava09;

import java.awt.BorderLayout;
import java.awt.Color;
import java.awt.Container;
import java.awt.GridLayout;

import javax.swing.JButton;
import javax.swing.JFrame;
import javax.swing.JLabel;
import javax.swing.JPanel;
import javax.swing.JTextField;

public class h0907 extends JFrame {

	h0907() {
		setTitle("계산기 프레임");
		setSize(400, 400);
		setDefaultCloseOperation(EXIT_ON_CLOSE);

		Container c=getContentPane();
		JPanel pn=new JPanel();
		JPanel ps=new JPanel();
		JPanel pc=new JPanel();

		pn.setBackground(Color.LIGHT_GRAY);
		pc.setLayout(new GridLayout(4,4));
		ps.setBackground(Color.YELLOW);

		c.add(pc);
		c.add(pn, BorderLayout.NORTH);
		c.add(ps, BorderLayout.SOUTH);

		JLabel l1=new JLabel("수십입력");
		JTextField tf1=new JTextField(10);
		pn.add(l1);
		pn.add(tf1);

		JLabel l2=new JLabel("계산결과");
		JTextField tf2=new JTextField(10);
		ps.add(l2);
		ps.add(tf2);

		for(int i=0; i<16; i++) {
			JButton b=new JButton();
			String[] str= {"CE","Enter","+","-","x","/"};
			pc.add(b);
			if(i<10) {
				b.setText(i+"");
			}else {
				b.setText(str[i-10]);
			}
			if(i>11) {
				//b.setBackground(Color.CYAN);
				b.setOpaque(true);
			}
		}
		setVisible(true);
			}

	public static void main(String[] args) {
		new h0907();
	}
}
※ 입출력도 되는 계산기 (10장에서 이벤트를 배우면 만들 수 있다.)
package test09;

import java.awt.BorderLayout;
import java.awt.Color;
import java.awt.Container;
import java.awt.GridLayout;
import java.awt.event.ActionEvent;
import java.awt.event.ActionListener;
import java.util.StringTokenizer;

import javax.swing.JButton;
import javax.swing.JFrame;
import javax.swing.JLabel;
import javax.swing.JPanel;
import javax.swing.JTextField;

public class h0907 extends JFrame implements ActionListener{
	String[] str = {"CE", "계산", "+", "-", "x", "%"};
	JTextField tf1, tf2;
	String numStr="";

	public h0907() {
		setTitle("계산기프레임");
		setSize(300, 300);
		setDefaultCloseOperation(JFrame.EXIT_ON_CLOSE);

		Container c = getContentPane();
		JPanel pn = new JPanel();
		JPanel ps = new JPanel();
		JPanel pc = new JPanel();

		pn.setBackground(Color.LIGHT_GRAY);
		ps.setBackground(Color.LIGHT_GRAY);
		pc.setLayout(new GridLayout(4, 4, 5, 5));

		JLabel label1 = new JLabel("수식입력");
		tf1 = new JTextField(10);
		pn.add(label1);
		pn.add(tf1);

		JLabel label2 = new JLabel("계산결과");
		tf2 = new JTextField(10);
		ps.add(label2);
		ps.add(tf2);

		for (int i = 0; i < 16; i++) {
			JButton b = new JButton();
			if (i < 10) {
				b.setText(i + ""); // 문자열. Integer.toString(i);
				b.setBackground(Color.WHITE); // 0~10까지
			} else {
				b.setText(str[i - 10]); // ce, 계산
				b.setBackground(Color.WHITE);
			}
			if (i > 11)
				b.setBackground(Color.WHITE); // 연산기호
			pc.add(b);
			b.addActionListener(this);
		}
		c.add(pc);
		c.add(pn, BorderLayout.NORTH);
		c.add(ps, BorderLayout.SOUTH);
		setVisible(true);
	}

	public static void main(String[] args) {
		new h0907();
	}
	@Override
	public void actionPerformed(ActionEvent e) {
		String str=e.getActionCommand();

		if(str.equals("CE")) {
			numStr="";
			tf1.setText(numStr);
			tf2.setText("");
		}else if(str.equals("계산")) {
			StringTokenizer st=new StringTokenizer(numStr, "+-x%", true);  //구분자를 넣는다.
			int num1=Integer.parseInt(st.nextToken());
			String op=st.nextToken();
			int num2=Integer.parseInt(st.nextToken());
			switch(op) {
			case "+" : tf2.setText(num1+num2+""); break;
			case "-" : tf2.setText(num1-num2+""); break;
			case "x" : tf2.setText(num1*num2+""); break;
			case "%" : tf2.setText(num1/num2+""); break;
				default: tf2.setText("오류"); break;
			}
			numStr="";
			tf1.setText(numStr);
		}else {
			numStr+=str;
			tf1.setText(numStr);
					}
		}
}
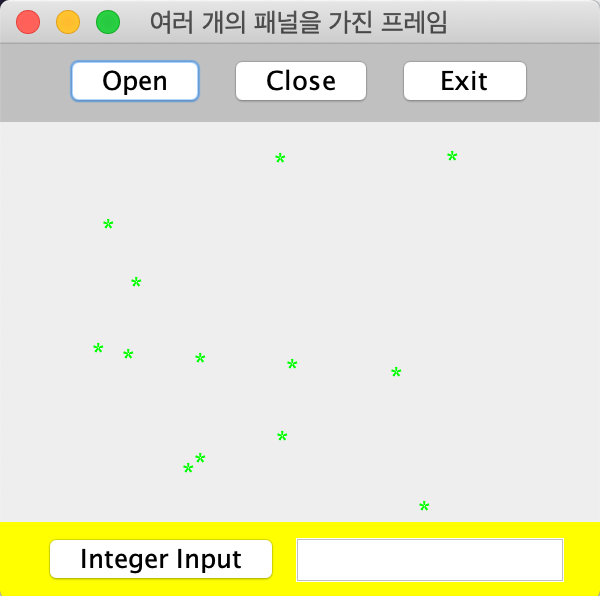
8. 다음과 같은 GUI 모양을 가진 스윙프레임을 작성하라. Open Challenge의 힌트나 정답을 참고하라. 10개의 *문자는 0개의 JLabel을 이용하여 랜덤한 위치에 출력하라. #9장실습문제8번
※ 여러 개의 컴포넌트와 패널을 가진 스윙 프레임 만들기


package Luxuryjava09;

import java.awt.BorderLayout;
import java.awt.Color;
import java.awt.FlowLayout;
import java.awt.TextField;

import javax.swing.JButton;
import javax.swing.JFrame;
import javax.swing.JLabel;
import javax.swing.JPanel;


	class NorthPanel extends JPanel{
		public NorthPanel() {
			setBackground(Color.LIGHT_GRAY);
		//	setLayout(new FlowLayout());
			add(new JButton("Open"));
			add(new JButton("Close"));
			add(new JButton("Exit"));
		}
	}
	class CenterPanel extends JPanel{
		public CenterPanel() {
			setLayout(null);
			for (int i = 0; i < 20; i++) {
				int x = (int)(Math.random()*250);
				int y = (int)(Math.random()*250);
				JLabel label=new JLabel("*");
                label.setForeground(Color.GREEN);
				label.setLocation(x,y);
				label.setSize(20, 20);
				label.setOpaque(true);
				add(label);
				}
		}
	}
	class SouthPanel extends JPanel{
			public SouthPanel() {
			setBackground(Color.YELLOW);
			add(new JButton("Integer Input"));
			add(new TextField(15));
		}
	}

public class h0908 extends JFrame{
		h0908(){
			setTitle("여러 개의 패널을 가진 프레임");
			setSize(300, 300);
			setDefaultCloseOperation(JFrame.EXIT_ON_CLOSE);

	NorthPanel nP=new NorthPanel();
    CenterPanel nC=new CenterPanel();
	SouthPanel nS=new SouthPanel();
	add(nP, BorderLayout.NORTH);
	add(nS, BorderLayout.SOUTH);
	add(nC);
	setVisible(true);
	}

	public static void main(String[] args) {
		new h0908();
	}
}
※ 역시 책 9장에는 나오지 않지만, 입력한 숫자만큼 별을 랜덤으로 찍어서 출력하는 스윙 프레임 윈도우는 어떻게 만들까? (10장 내용이다.)
package exam;

import java.awt.BorderLayout;
import java.awt.Color;
import java.awt.Container;
import java.awt.event.ActionEvent;
import java.awt.event.ActionListener;

import javax.swing.JButton;
import javax.swing.JFrame;
import javax.swing.JLabel;
import javax.swing.JPanel;
import javax.swing.JTextField;

public class Exam08 extends JFrame {

	Exam08(){
		setTitle("이벤트 처리");
		setSize(300, 300);
		setDefaultCloseOperation(EXIT_ON_CLOSE);
		Container c=getContentPane();
		JPanel pn=new JPanel();
		JPanel pc=new JPanel();
		JPanel ps=new JPanel();
		JButton openBtn=new JButton("열기");
		JButton closeBtn=new JButton("닫기");
		JButton exitBtn=new JButton("나가기");
		pn.add(openBtn);
		pn.add(closeBtn);
		pn.add(exitBtn);
		JTextField charTf=new JTextField(5);
		JTextField numTf=new JTextField(5);
		JButton okBtn=new JButton("OK");
		ps.add(charTf);
		ps.add(numTf);
		ps.add(okBtn);
		pc.setLayout(null);
		pc.setBackground(Color.WHITE);
		pn.setBackground(Color.GRAY);
		ps.setBackground(Color.YELLOW);

		c.add(pn, BorderLayout.NORTH);
		c.add(pc);
		c.add(ps,BorderLayout.SOUTH);

		okBtn.addActionListener(new ActionListener() {

			@Override
			public void actionPerformed(ActionEvent e) {
				String str=charTf.getText();
				int num=Integer.parseInt(numTf.getText());
				for(int i=0; i<num;i++) {
					int x=(int)(Math.random()*200)+10;
					int y=(int)(Math.random()*150)+10;
					JLabel la=new JLabel(str);
					la.setBounds(x, y, 10,10);
					pc.add(la);
				}
				pc.revalidate();
				pc.repaint();
			}
		});
		setVisible(true);
	}
	public static void main(String[] args) {
		new Exam08();
	}
}
// [출처] 9장 연습문제|작성자 솔라 >>> https://blog.naver.com/miya_2009'Java Friends > Java' 카테고리의 다른 글
| 명품자바프로그래밍 11장 요약,예제 (0) | 2019.07.21 |
|---|---|
| 명품자바프로그래밍 10장 요약,예제 (0) | 2019.07.21 |
| 명품자바프로그래밍 9장 연습문제 (5) | 2019.07.21 |
| 명품자바프로그래밍 9장 요약, 예제 (0) | 2019.06.09 |
| 명품자바프로그래밍 5장 요약, 예제 (2) | 2019.06.08 |

