
안드로이드 레이아웃
레이아웃은 ViewGroup 클래스로부터 상속된다. 아래는 레이아웃 안에서 자주 사용되는 속성이다.
* orientation : 배치할 위젯의 방향 설정. (수직(Vertical)/수평(Horiwontal) 중 설정).
* gravity : 위젯의 정렬 방향 설정 (좌, 우, 중앙). 중력의 시작점
* padding : 위젯의 여백
* layout_weight : 레이아웃이 전체 화면에서 차지하는 공간의 가중 값. 여러 레이아웃이 중복될 때 사용
* baselineAligned : 보기 좋게 정렬. true / false
안드로이드 레이아웃 종류
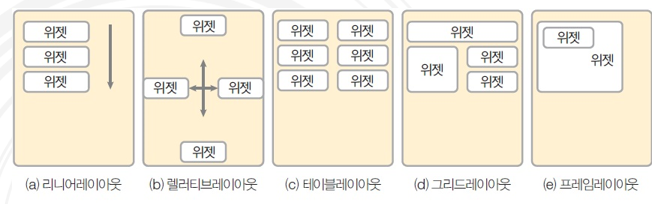
1) 리니어 (LinearLayout) : 가장 많이 사용. 왼쪽 위부터 아래쪽 또는 오른쪽으로 차례로 배치
2) 렐러티브** : 관계적 레이아웃. 위젯 자신이 속한 레이아웃의 상하좌우 위치를 지정.
3) 테이블 : span 기능이 없다.
4) 그리드 : 그리드레이아웃은 웹(html)의 테이블 개념과 가깝다.
5) 프레임 : 왼쪽 위에 일률적으로 겹쳐 배치, 중복된 것 처럼 보인다.
1. 리니어레이아웃의 속성들
orientation, gravity, layout_gravity
android:orientation="vertical"
android:gravity="right:bottom"
android:layout_gravity="center"
baselineAligned : 크기가 다른 위젯들을 보기 좋게 정렬하며 true, false 값을 가진다.

중복 리니어레이아웃으로 LinearLayout 안에 LinearLayout들을 가질 수 있다.
layout_weight: 리니어 레이아웃이 여러개일때 가중치로 각 레이아웃의 크기를 지정한다. (1:1:1) 비율로 생각하면 편함
LinearLayout, gridLayout일 때만 먹히는 속성이다. relative는 먹지 않는다.
android:layout_weight="1"
android:layout_weight="1"
android:layout_weight="1"
2. 렐러티브레이아웃
상대레이아웃은 레이아웃 내부에 포함된 위젯들을 상대적인 위치로 배치한다.
부모(레이아웃)이 기준이 될 수도 있고 뷰가 기준이 될 수도 있다.
layout_alignParentLeft
layout_alignParentRight
layout_alignParentTop
layout_alignParentBottom
layout_centerVertical
layout_centerHorizontal
다른 위젯의 상대 위치에 배치할 때는 다른 위젯에 id를 지정해서 사용
@+id/기준 위젯의 아이디

3. 테이블레이아웃
좌우로 합치는 것만 된다. row개념으로 생각하면 된다. <TableRow> 태그를 사용하는데 이 개수가 행의 개수가 된다. 열의 개수는 이 안에 포함된 위젯의 개수로 결정. 첫 번째 셀은 0부터 시작
layout_column : 지정된 열에 현재 위젯 표시
stretchColumns : 지정된 열의 폭을 늘린다.
stretchColumns = "*" : 각 셀을 같은 크기로 확장, 전체화면 꽉 채움
4. 그리드레이아웃
위젯을 표 형태로 배치할 때 사용.
rowCount 행 개수
columnCount 열 개수
orientation : 방향 우선
layout_row : 자신이 위치할 행 번호 (0부터 시작)
layout_column : 자신이 위치할 열 번호 (0부터)
layout_rowSpan : 행을 지정된 개수만큼 확장
layout_columnSpan : 열을 지정된 개수만큼 확장
layout_gravity : fill, fill_vertical, foll_horizontal. 셀 확장 시 위젯을 확장된 셀에 꽉 채우는 효과
5. 프레임레이아웃
탭 위젯 등과 혼용해 사용할 때 유용. html의 z-index처럼 순서를 잘 조절해서 사용한다. visibility를 이용해서 조절한다.
개발에서 까다로운 편이다.
foreground : 전경 이미지
foregroundGravity : 전경 이미지의 위치
문제풀기
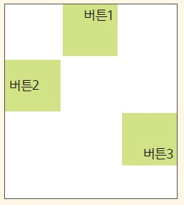
5-1 리니어레이아웃으로 다음 화면을 구성하는 XML을 작성하라.
* orientation : vertical
* button은 총 3개이며 layout_width : 110dp, layout_height:100dp
* 각각 중앙, 좌측, 우측 배열을 설정한다.
* button에 gravity와 layout_gravity(부모 기준)를 모두 설정한다.
<?xml version="1.0" encoding="utf-8"?>
<LinearLayout xmlns:android="http://schemas.android.com/apk/res/android"
              android:orientation="vertical"
              android:layout_width="match_parent"
              android:layout_height="match_parent">

    <Button android:layout_width="110dp"
            android:layout_height="100dp"
            android:text="버튼1"
            android:layout_gravity="center"
            android:gravity="right|top"
    />
    <Button android:layout_width="110dp"
            android:layout_height="100dp"
            android:gravity="left|center"
            android:text="버튼2"
    />
    <Button android:layout_width="110dp"
            android:layout_height="100dp"
            android:text="버튼3"
            android:layout_gravity="end"
			android:gravity="right|bottom"
    />
</LinearLayout>
5-2 리니어레이아웃으로 다음 화면을 구성하는 XML을 작성하라. 단 레이아웃은 구분되어 보이도록 서로 다른색으로 하며 레이아웃 안에 다시 레이아웃을 중첩해도 된다.

<?xml version="1.0" encoding="utf-8"?>
<LinearLayout xmlns:android="http://schemas.android.com/apk/res/android"
              android:orientation="vertical"
              android:layout_width="match_parent"
              android:layout_height="match_parent">
    <LinearLayout
            android:orientation="horizontal"
            android:layout_width="match_parent"
            android:layout_height="wrap_content"
            android:layout_weight="1">
        <LinearLayout
                android:orientation="vertical"
                android:layout_width="wrap_content"
                android:layout_height="match_parent"
                android:background="#00bb00"
                android:layout_weight="1"
                >
        </LinearLayout>
        <LinearLayout
                android:orientation="vertical"
                android:layout_width="wrap_content"
                android:layout_height="match_parent"
                android:layout_weight="1">
            <LinearLayout
                    android:orientation="vertical"
                    android:layout_width="match_parent"
                    android:layout_height="wrap_content"
                android:background="#000000"
                android:layout_weight="1">
            </LinearLayout>
            <LinearLayout
                    android:orientation="vertical"
                    android:layout_width="match_parent"
                    android:layout_height="wrap_content"
                android:background="#dddddd"
                android:layout_weight="1">
            </LinearLayout>
        </LinearLayout>
    </LinearLayout>

    <LinearLayout
            android:layout_width="match_parent"
            android:layout_height="wrap_content"
            android:layout_weight="1"
            android:background="#00FF00">
    </LinearLayout>
</LinearLayout>
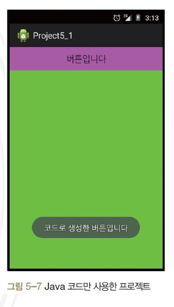
5-3 버튼을 클릭하면 토스트 메시지가 출력되는 화면을 자바로 코딩해보자.
* XML 없이 자바로만 화면 코딩 (추천하지는 않으나 할 줄은 알아야 한다.)
프로젝트명 : Project5_1
패키지명 : com.cookandroid.project5-1
토스트 메세지 내용 : 코드로 생성한 버튼입니다.
MainActivity.java
package com.example.project5_1;

import androidx.appcompat.app.AppCompatActivity;

import android.graphics.Color;
import android.os.Bundle;
import android.view.View;
import android.widget.Button;
import android.widget.LinearLayout;
import android.widget.Toast;

public class MainActivity extends AppCompatActivity {

    @Override
    protected void onCreate(Bundle savedInstanceState) {
        super.onCreate(savedInstanceState);
        setContentView(R.layout.activity_main);

        LinearLayout.LayoutParams params = new LinearLayout.LayoutParams(
                LinearLayout.LayoutParams.MATCH_PARENT,
                LinearLayout.LayoutParams.MATCH_PARENT);

        LinearLayout baseLayout = new LinearLayout(this);
        baseLayout.setOrientation(LinearLayout.VERTICAL);
        baseLayout.setBackgroundColor(Color.rgb(0,255,0));
        setContentView(baseLayout,params);

        Button btn = new Button(this);
        btn.setText("버튼입니다");
        btn.setBackgroundColor(Color.MAGENTA);
        baseLayout.addView(btn);

        btn.setOnClickListener(new View.OnClickListener(){
            public void onClick(View arg0){
                Toast.makeText(getApplicationContext(),
                        "코드로 생성한 버튼입니다",
                        Toast.LENGTH_SHORT).show();
            }
        });
    }
}
activity_main.xml
<?xml version="1.0" encoding="utf-8"?>
<androidx.constraintlayout.widget.ConstraintLayout xmlns:android="http://schemas.android.com/apk/res/android"
    xmlns:app="http://schemas.android.com/apk/res-auto"
    xmlns:tools="http://schemas.android.com/tools"
    android:layout_width="match_parent"
    android:layout_height="match_parent"
    tools:context=".MainActivity">

    <TextView
        android:layout_width="wrap_content"
        android:layout_height="wrap_content"
        android:text="Hello World!"
        app:layout_constraintBottom_toBottomOf="parent"
        app:layout_constraintLeft_toLeftOf="parent"
        app:layout_constraintRight_toRightOf="parent"
        app:layout_constraintTop_toTopOf="parent" />

</androidx.constraintlayout.widget.ConstraintLayout>
5-4 다음 화면을 XML파일 없이 Java 코드만 이용하여 완성하라. 레이아웃에는 에디트텍스트 1개와 버튼 1개, 텍스트뷰 1개를 생성한다. 버튼을 클릭하면 에디트텍스트에 써진 문자열이 텍스트뷰에 나타나도록 한다.

MainActivity.java
package com.example.project5_1;

import androidx.appcompat.app.AppCompatActivity;

import android.graphics.Color;
import android.os.Bundle;
import android.view.View;
import android.widget.Button;
import android.widget.EditText;
import android.widget.LinearLayout;
import android.widget.TextView;

public class MainActivity extends AppCompatActivity {
    TextView tv;  //멤버. 그래야 안에서 쓸 수 있다
    EditText et;

    @Override
    //전역(final:어디서든 부를 수 있다), 지역
    protected void onCreate(Bundle savedInstanceState) {
        super.onCreate(savedInstanceState);
        setContentView(R.layout.activity_main);

        LinearLayout.LayoutParams params = new LinearLayout.LayoutParams(
                LinearLayout.LayoutParams.MATCH_PARENT,
                LinearLayout.LayoutParams.MATCH_PARENT);

        LinearLayout baseLayout = new LinearLayout(this);
        baseLayout.setOrientation(LinearLayout.VERTICAL);
        setContentView(baseLayout, params);

        et = new EditText(this);
        et.setHint("값을 입력하세요");
        baseLayout.addView(et);

        tv = new TextView(this);
        baseLayout.addView(tv);

        Button btn = new Button(this);
        btn.setText("버튼입니다");
        btn.setBackgroundColor(Color.YELLOW);
        baseLayout.addView(btn);

        btn.setOnClickListener(new View.OnClickListener(){
            public void onClick(View argo){
                tv.setText(et.getText().toString());
            }
        });

    }
}
5-5 다음 화면의 XML 코드를 중복 리니어레이아웃과 렐러티브레이아웃으로 각각 작성해보자. 텍스트뷰 1개, 에디트텍스트 1개, 버튼 2개로 구성한다.

<?xml version="1.0" encoding="UTF-8"?>

	<LinearLayout tools:context=".MainActivity"
    	android:orientation="vertical"
        android:layout_height="match_parent"
        android:layout_width="match_parent"
        xmlns:tools="http://schemas.android.com/tools"
        xmlns:app="http://schemas.android.com/apk/res-auto"
        xmlns:android="http://schemas.android.com/apk/res/android">

        <LinearLayout
    		android:orientation="horizontal"
       	 	android:layout_height="wrap_content"
        	android:layout_width="match_parent">

		<TextView
			android:layout_height="wrap_content"
   			android:layout_width="wrap_content"
   			android:textSize="30sp"
    		android:text="전화번호:"/>

		<EditText
			android:layout_height="wrap_content"
  		  	android:layout_width="match_parent"
  		  	android:text="000-0000-0000"/>

		</LinearLayout>

        <LinearLayout
            android:orientation="horizontal"
            android:layout_height="wrap_content"
            android:layout_width="match_parent"
            android:gravity="right">

            <Button
                android:layout_height="wrap_content"
                android:layout_width="wrap_content"
                android:text="입력"/>

            <Button
                android:layout_height="wrap_content"
                android:layout_width="wrap_content"
                android:text="취소"/>

        </LinearLayout>

	</LinearLayout>
<?xml version="1.0" encoding="UTF-8"?>
<RelativeLayout
android:layout_height="match_parent"
android:layout_width="match_parent"
xmlns:android="http://schemas.android.com/apk/res/android">
<TextView
android:layout_height="wrap_content"
android:layout_width="wrap_content"
android:textSize="30sp"
android:text="전화번호"
android:id="@+id/tv1"/>
<EditText
android:layout_height="wrap_content"
android:layout_width="match_parent"
android:hint="000-0000-0000"
android:layout_toRightOf="@+id/tv1"/>
<Button
android:layout_height="wrap_content"
android:layout_width="wrap_content"
android:text="취소"
android:id="@+id/btn1"
android:layout_alignParentRight="true"
android:layout_below="@+id/tv1"/>
<Button
android:layout_height="wrap_content"
android:layout_width="wrap_content"
android:text="확인"
android:layout_alignBaseline="@+id/btn1"
android:layout_toLeftOf="@+id/btn1"/>
</RelativeLayout>
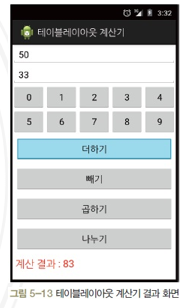
5-6 테이블레이아웃을 활용하여 숫자 버튼까지 있는 계산기를 만들어보자.
프로젝트명 :Project5_2
패키지명 :com.cookandroid.project5-2
TableLayout (1) TableRow (9) EditText(2) 숫자Button(10) 연산 Button(4) TextView(1)
연산 버튼 위젯에 layout_margin 재량껏 지정하며 결과를 보여줄 TextView 는 빨간색상, 글자 크기는 20dp 지정하며 각 위젯의 id는 차례로 Edit1, Edit2, BtnNum0~9, BtnAdd, BtnSub, BtnMul, BtnDiv, TextResult로 지정한다.
<?xml version="1.0" encoding="UTF-8"?>

	<GridLayout
        android:orientation="vertical"
        android:columnCount="5"
        android:rowCount="9"
        android:layout_height="match_parent"
        android:layout_width="match_parent"
        android:id="@+id/tableLayout1"
        xmlns:tools="http://schemas.android.com/tools"
        xmlns:android="http://schemas.android.com/apk/res/android">

		<EditText
            android:id="@+id/Edit1"
            android:hint="숫자1 입력"
            android:layout_gravity="fill_horizontal"
            android:layout_columnSpan="5"
            android:layout_weight="1"/>

		<EditText
            android:id="@+id/Edit2"
            android:hint="숫자2 입력"
            android:layout_gravity="fill_horizontal"
            android:layout_columnSpan="5"
            android:layout_weight="1"/>


		<LinearLayout
            android:layout_height="wrap_content"
            android:layout_width="match_parent">


 		<LinearLayout
          android:layout_height="wrap_content"
          android:layout_width="match_parent">

            <Button
              android:layout_height="wrap_content"
              android:layout_width="wrap_content"
              android:id="@+id/BtnNum5"
              android:layout_weight="1"
              android:text="5"/>

            <Button
              android:layout_height="wrap_content"
              android:layout_width="wrap_content"
              android:id="@+id/BtnNum6"
              android:layout_weight="1"
              android:text="6"/>

            <Button
                android:layout_height="wrap_content"
                android:layout_width="wrap_content"
                android:id="@+id/BtnNum7"
                android:layout_weight="1"
                android:text="7"/>

            <Button
                android:layout_height="wrap_content"
                android:layout_width="wrap_content"
                android:id="@+id/BtnNum8"
                android:layout_weight="1"
                android:text="8"/>

            <Button
                android:layout_height="wrap_content"
                android:layout_width="wrap_content"
                android:id="@+id/BtnNum9"
                android:layout_weight="1"
                android:text="9"/>

		</LinearLayout>

		<Button
        	android:layout_height="wrap_content"
            android:layout_width="wrap_content"
            android:id="@+id/BtnAdd"
            android:layout_gravity="fill_horizontal"
            android:layout_columnSpan="5"
            android:layout_weight="1"
            android:text="더하기"
            android:layout_margin="5dp"/>

		<Button
        	android:layout_height="wrap_content"
            android:layout_width="wrap_content"
            android:id="@+id/BtnSub"
            android:layout_gravity="fill_horizontal"
            android:layout_columnSpan="5"
            android:layout_weight="1"
            android:text="빼기"
            android:layout_margin="5dp"/>

		<Button
        	android:layout_height="wrap_content"
            android:layout_width="wrap_content"
            android:id="@+id/BtnMul"
            android:layout_gravity="fill_horizontal"
            android:layout_columnSpan="5"
            android:layout_weight="1"
            android:text="곱하기"
            android:layout_margin="5dp"/>

		<Button
        	android:layout_height="wrap_content"
            android:layout_width="wrap_content"
            android:id="@+id/BtnDiv"
            android:layout_gravity="fill_horizontal"
            android:layout_columnSpan="5"
            android:layout_weight="1"
            android:text="나누기"
            android:layout_margin="5dp"/>

		<TextView
        	android:layout_height="wrap_content"
            android:layout_width="wrap_content"
            android:id="@+id/TextResult"
            android:layout_gravity="fill_horizontal"
            android:layout_columnSpan="5"
            android:text="계산 결과 : "
            android:layout_margin="5dp"
            android:textSize="20dp"
            android:textColor="#FF0000"/>

</GridLayout>'Java Friends > Android' 카테고리의 다른 글
| 안드로이드 토스트 (0) | 2019.08.16 |
|---|---|
| 안드로이드 메뉴 (옵션 메뉴, 컨텍스트 메뉴) (0) | 2019.08.14 |
| 안드로이드 뷰 컨테이너 (스크롤뷰, 슬라이딩드로어, 뷰플리퍼, 탭호스트, 액션바, 프래그먼트, 웹뷰) (0) | 2019.08.13 |
| 안드로이드 고급 위젯(캘린더, 시계, 스크롤뷰, 텍스트자동완성, 프로그래스바, 시크바, 레이팅바) (0) | 2019.08.13 |
| 안드로이드 스튜디오 다운 후 새 프로젝트 만들기까지 (0) | 2019.08.07 |

coding-restaurant
코딩 맛집에 방문해주셔서 감사합니다.